Controller
This guide will show you how to use the Nreal Light controller and Nreal phone controller. The tutorial will demonstrate how to create apps using Nreal Light controller as an interaction model.
Introduction
Controllers provide a simple way for users to navigate in mixed reality. In the latest version, NRSDK supports two types of controlling methods: Nreal Light controller and Nreal phone controller. The Nreal Light controller can be paired with a Nreal Light computing unit or a mobile phone through Bluetooth. The Nreal phone controller is only available when using the phone as Nreal Light's computing unit.
Currently, only the Nreal Light controller (available in the Nreal Developer Kit) is available to developers. The Nreal phone controller will serve as a second input choice for users in the future.
How to Use the Nreal Light Controller
The Nreal Light Controller
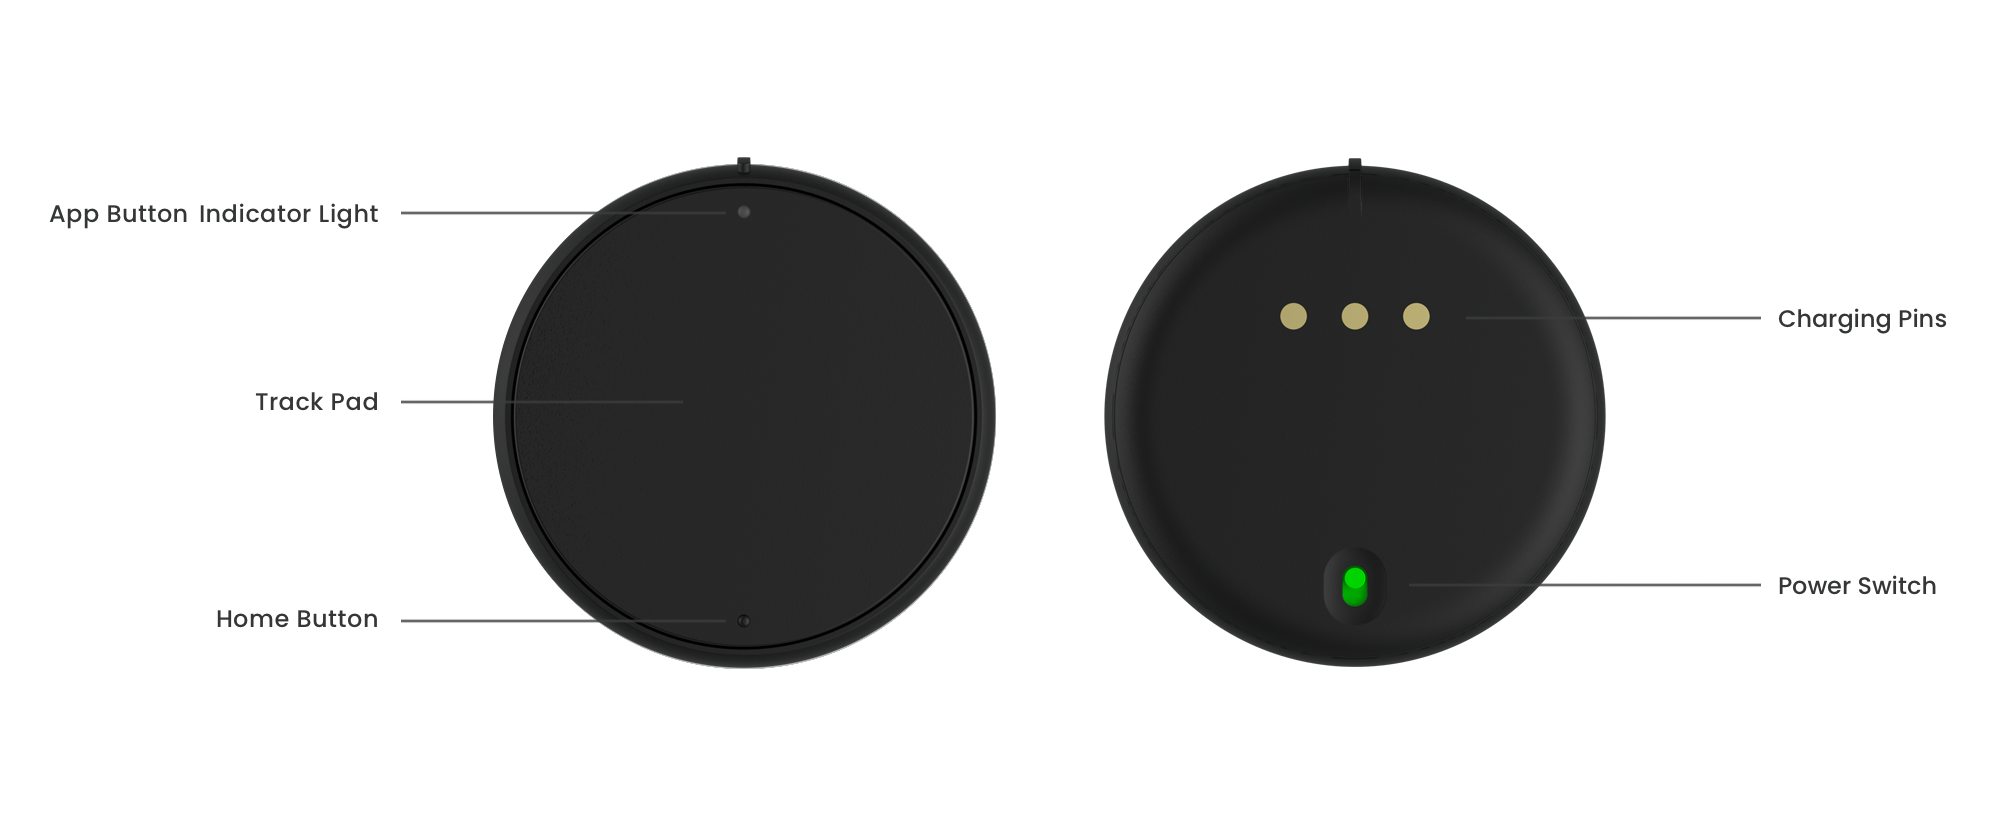
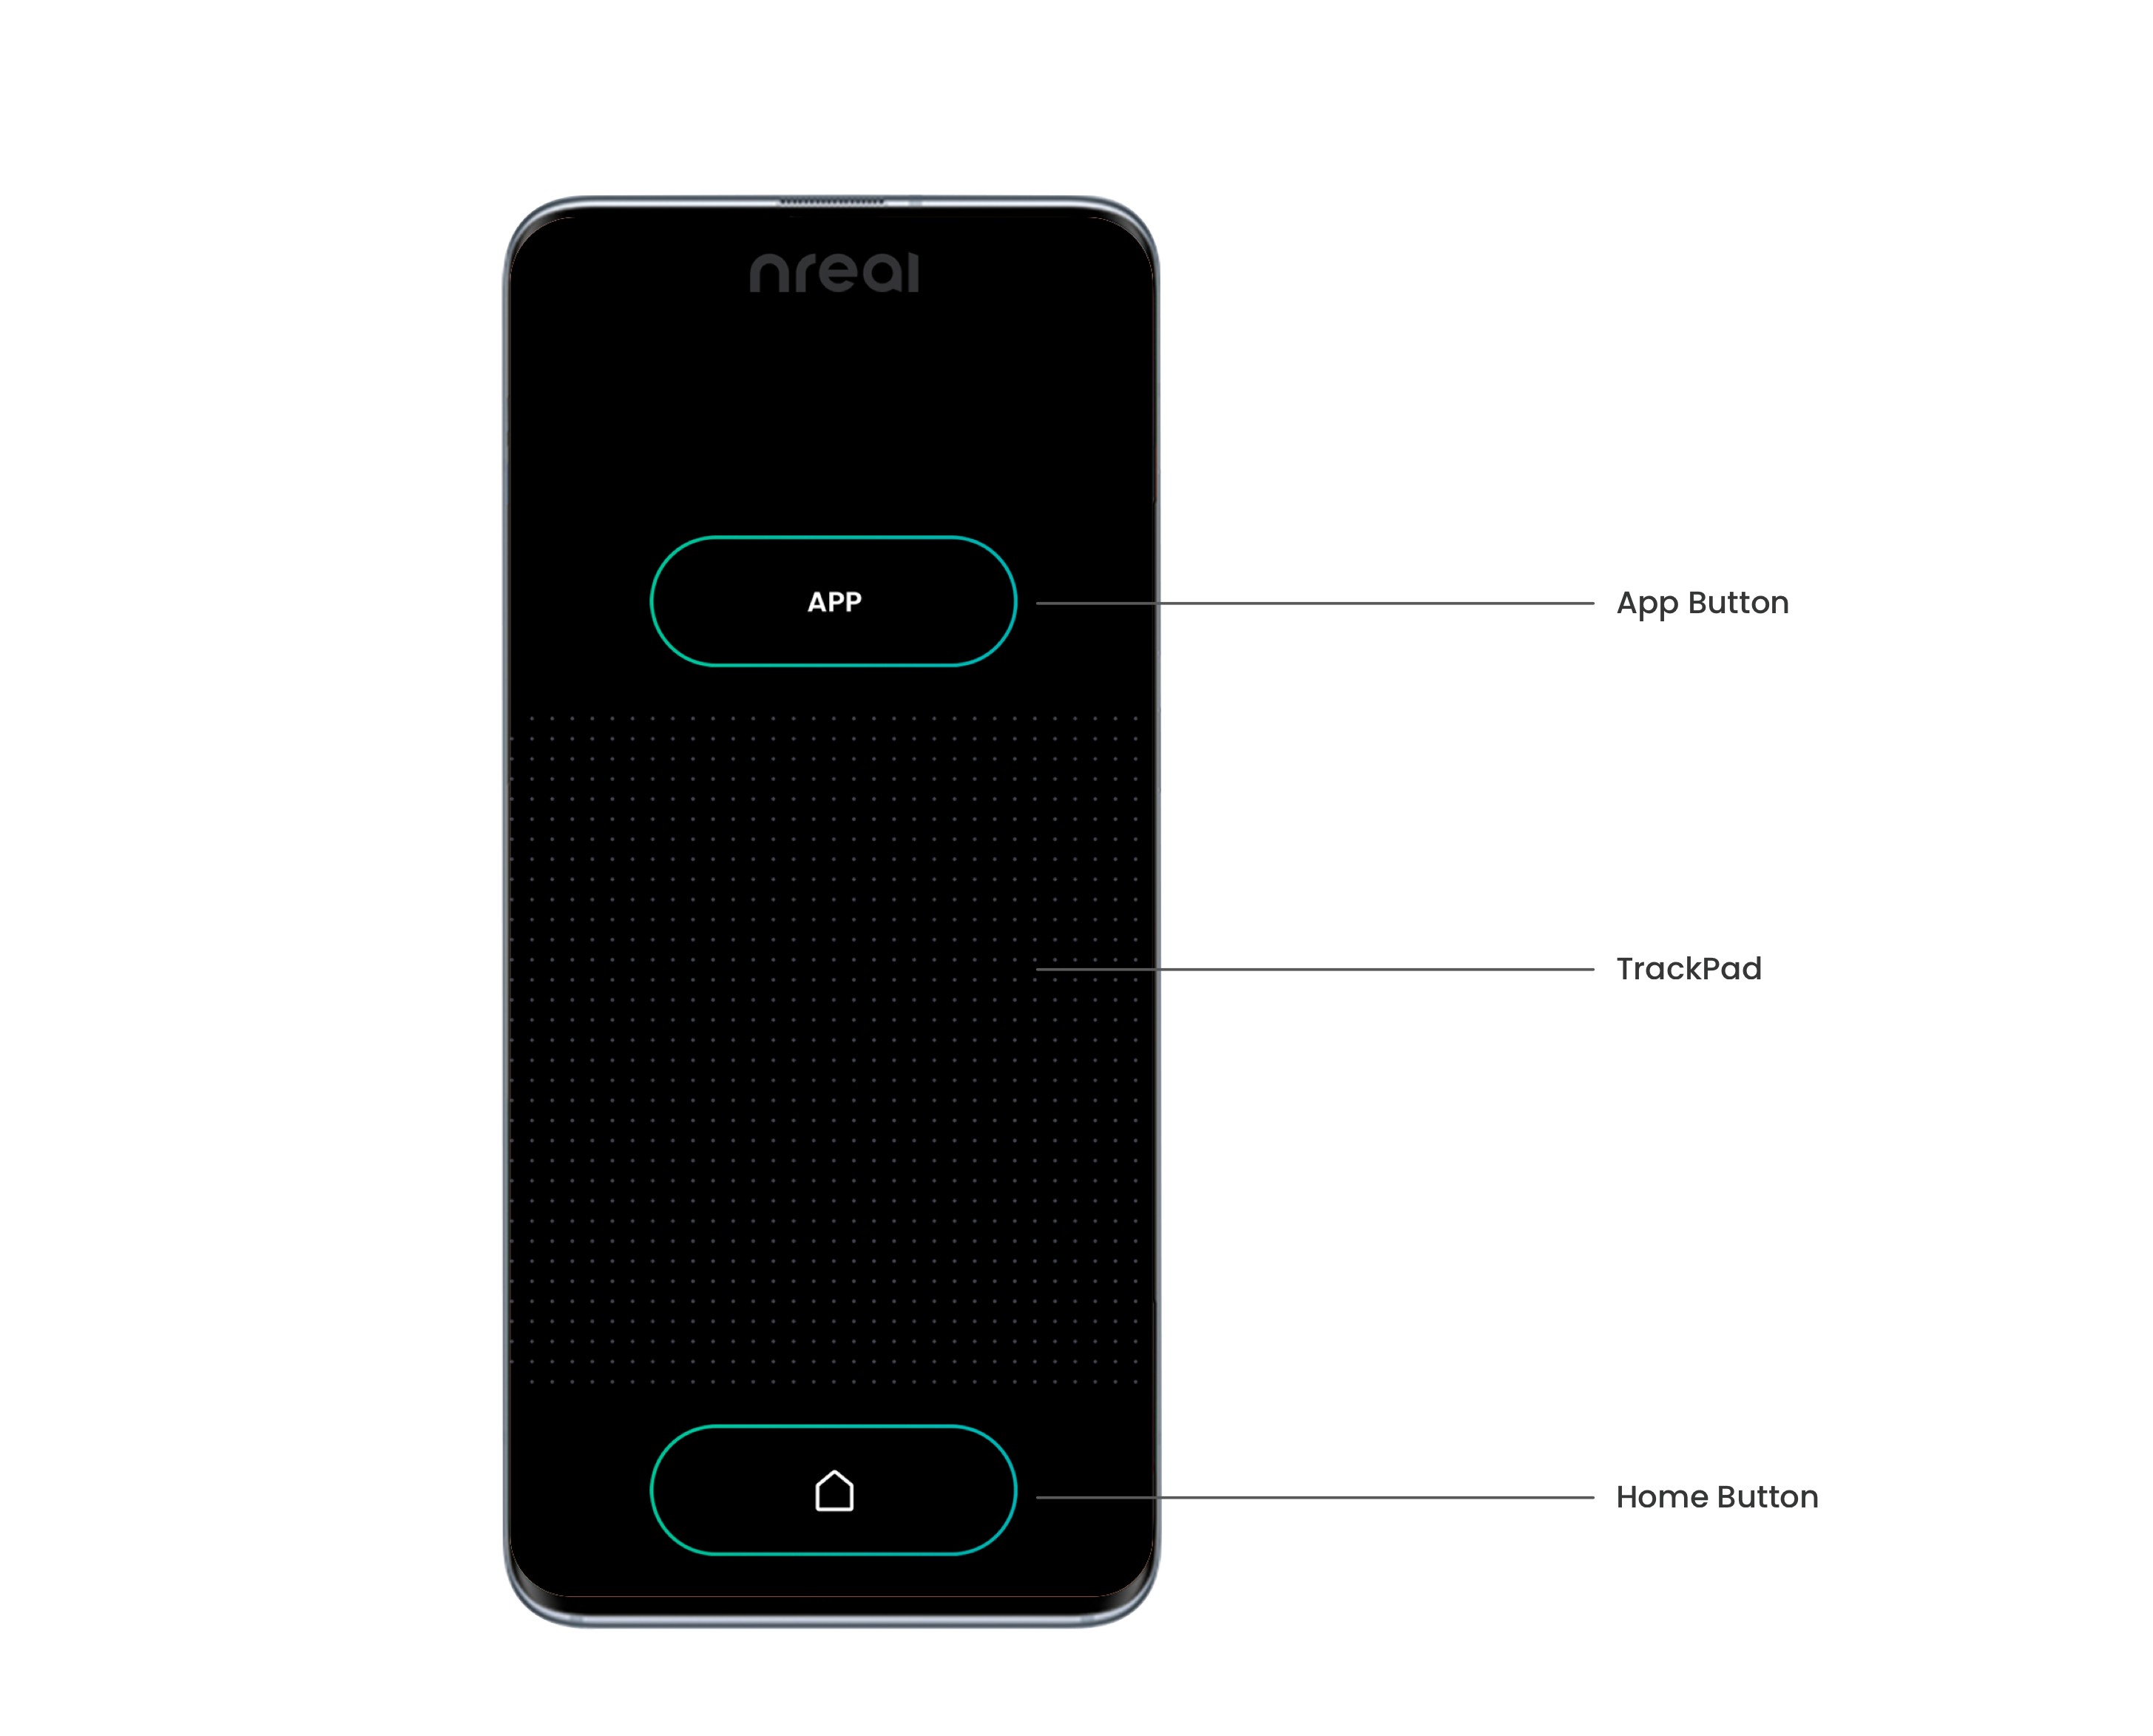
- On the front
| Controller Features | Description |
|---|---|
| 3DoF Tracking | 3 degrees of freedom |
| Touchpad | Press = Trigger Button. Can detect touching and clicking. Customizable for your app, e.g. scrolling. |
| App Button | Press and hold to recenter your controller. Press can be customized for your app, e.g. opening an in-app menu or performing a special action. ( Pay attention: For Nreal Light Controller, pressing the App Button equals to pressing the Touchpad Button) |
| Home Button | Press and hold to open Exit App Window.</font> Press can be customized for in-app action, e.g. return to the previous step. |
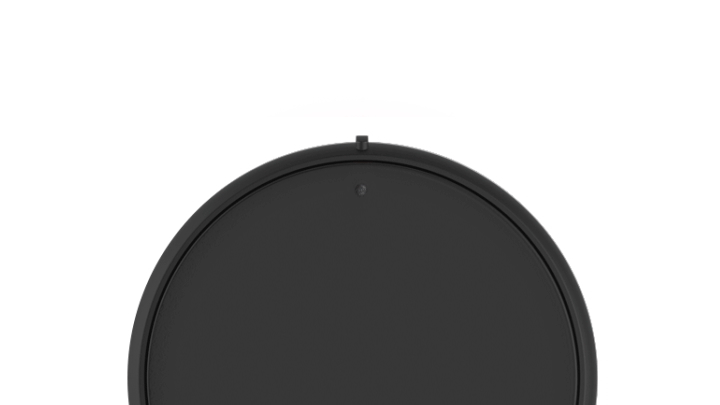
| LED Light | Display controller status |
- On the back
| Controller Features | Description |
|---|---|
| Charging pins | The three bottom-facing charging pins connect the controller with the computing unit. It is also used to send data from the computing unit to the controller. |
| Power Switch | The Nreal Light controller on/off switch is below the charging spots. Green means the power is on, and red means the power is off. |
- Nreal Light Controller LED Guide
See LED demo below:
- Connecting the Nreal Light Controller
- Make sure the Bluetooth on your Neal Light computing unit/or Android mobile phone is on. (The Bluetooth on Nreal Light computing unit is on as default.)
- Turn the Nreal Light controller power switch on. Long press the touchpad until the green light starts blinking.
- Put the Nreal Light controller on the computing unit, and they will be paired automatically.
- If pairing is successful, the LED will stop blinking and become solid green. If you cannot complete this step, remove all other controllers in the Bluetooth record list and try again.
- Charging the Nreal Light Controller
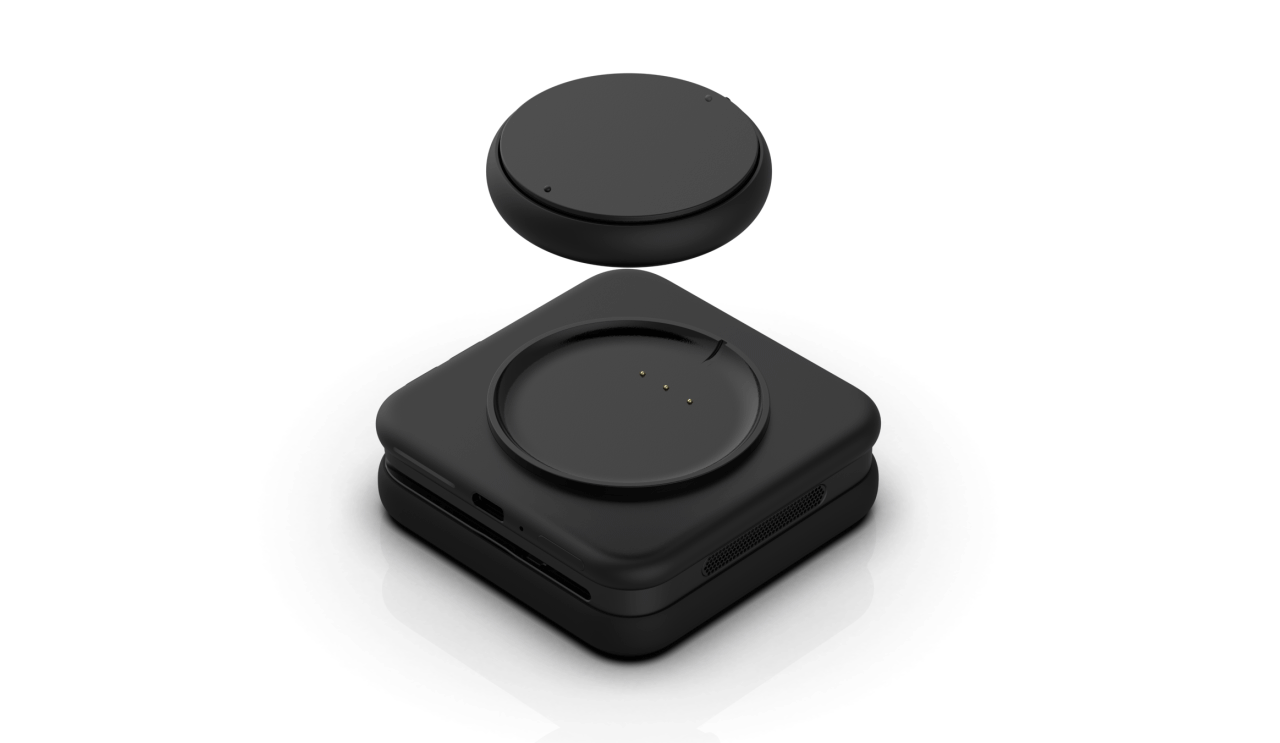
Magnetically attach to the Nreal Light computing unit. Battery power will be shared between the two whether the controller is on or off.
The lithium battery in the controller is not removable. Please do not attempt to open the controller. Damage caused this way cannot be fixed.
How to Use Your Phone as a Controller
| Controller Features | Description |
|---|---|
| 3DoF Tracking | 3 degrees of freedom |
| Touchpad | Press = Trigger Button. Can detect touching and clicking. Customizable for your app, e.g. scrolling. |
| App Button | Press and hold to recenter your controller. Press can be customized for your app, e.g. opening an in-app menu or performing a special action. |
| Home Button | Press and hold to open Exit App Window. Press can be customized for in-app action, e.g. return to the previous step. |
Tutorial: Nreal Light Controller
Input in Unity
These following points will help you better understand the Input from NRSDK in Unity.
ControllerProvider: This provides various controller state information to NRInput, including rotation, button press, button up, battery, and gyro. There is a default provider for Nreal controllers. You can also write a custom controller provider.
EventSystem: Integration with Unity's standard EventSystem supports user interaction with GUI and other physical objects. NRIput will automatically generate an EventSystem when the application runs.
Visualizations: Default visualizations, such as controller visual, ray visual, and reticle visual, are already included. There is also an interface for you to reskin visualizations.
Enabling NRInput
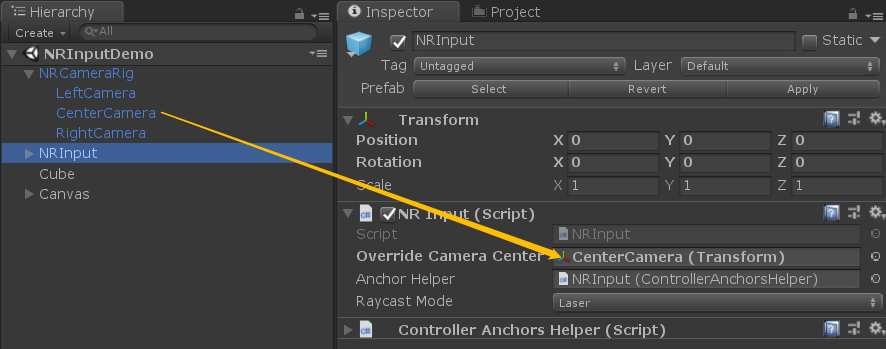
To enable NRInput, simply drag the NRInput prefab into your scene hierarchy. If you already have a Main Camera set up, drag it onto Override Camera Center in the NRInput prefab. Otherwise, the prefab will find the Main Camera. Users can now interact in the app using Nreal Light controllers.
Raycast Modes in NRInput
There are two raycasting modes included in the NRInput: the Gaze Mode and the Ray Mode.
The Ray Mode is the default raycasting mode most apps will be based on. In this mode, the ray will start from the center of the controller.
When in Gaze Mode, the raycast will start from the center of the user's forehead and emanate in a forward direction. Thus, the ray will be invisible.
Current Controller Features
Since NRSDK supports multiple types of controllers, a method was scripted to help you understand the features your current controller supports.
- Sample Use Case:
bool supportsPosition = NRInput.GetControllerAvailableFeature(ControllerAvailableFeature.CONTROLLER_AVAILABLE_FEATURE_POSITION);
bool supportsGyro = NRInput.GetControllerAvailableFeature(ControllerAvailableFeature.CONTROLLER_AVAILABLE_FEATURE_GYRO);
Some Common Usage of NRInput
- Sample Use Case:
void Update()
    {
        //returns a int value of how many available controllers currently
        NRInput.GetAvailableControllersCount();

        //returns true if a Trigger button is currently pressed
        NRInput.GetButton(ControllerButton.TRIGGER);

        //returns true if a Trigger button was pressed down this frame
        NRInput.GetButtonDown(ControllerButton.TRIGGER);

        //returns true if a Trigger button was released this frame
        NRInput.GetButtonUp(ControllerButton.TRIGGER);

        //returns Vector3.zero if controller is 3DoF, otherwise returns the position of the domain controller
        NRInput.GetPosition();

        //returns the rotation of the domain controller
        NRInput.GetRotation();

        //returns the ControllerType of the domain controller
        ControllerType controllerType = NRInput.GetControllerType();

        //returns true if the touchpad is being touched
        NRInput.IsTouching();

        //returns a Vector2 value of the touchpad, x(-1f ~ 1f), y(-1f ~ 1f)
        NRInput.GetTouch();

        //returns a Vector3 value of gyro if supports
        NRInput.GetGyro();

        //to get what hand mode is using now, left-hand or right-hand
        ControllerHandEnum domainHand = NRInput.DomainHand;

        //the same as NRInput.GetRotation()
        NRInput.GetRotation(NRInput.DomainHand);

        //returns the rotaion of the left hand controller
        NRInput.GetRotation(ControllerHandEnum.Right);
    }
Get Frequently Used Anchors
The NRInput provides an easy way to get frequently used anchors quickly.
- Sample Use Case:
Transform gazeAnchor = NRInput.AnchorsHelper.GetAnchor(ControllerAnchorEnum.GazePoseTrackerAnchor);
Transform leftRayAnchor = NRInput.AnchorsHelper.GetAnchor(ControllerAnchorEnum.LeftRayAnchor);
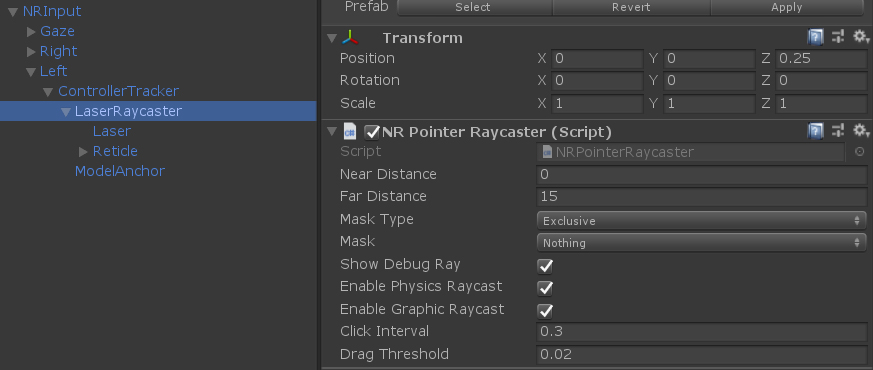
Raycasters in NRInput
Three raycasters are included in the NRInput prefab. One of which for Gaze Mode, and the other two for Ray Mode. The raycaster class inherits from Unity's BaseRaycaster class. A chosen raycaster's farthest raycasting distance can be modified directly from the Inspector window. You can also define which objects are interactable by changing the parameter of its Mask.
Building a Project with User Input
To help you get started with integrating control into your own app, we have prepared a sample case study.
By reading the study you will be able to:
- Select a range of appropriate inputs to use with the controller.
- Write code in C# to receive user inputs such as the Home, Bumper, Trigger and Touchpad.
- Activate, rotate, and move a GameObject by using the input.
- Interact with physical objects and UGUI in the unity environment.
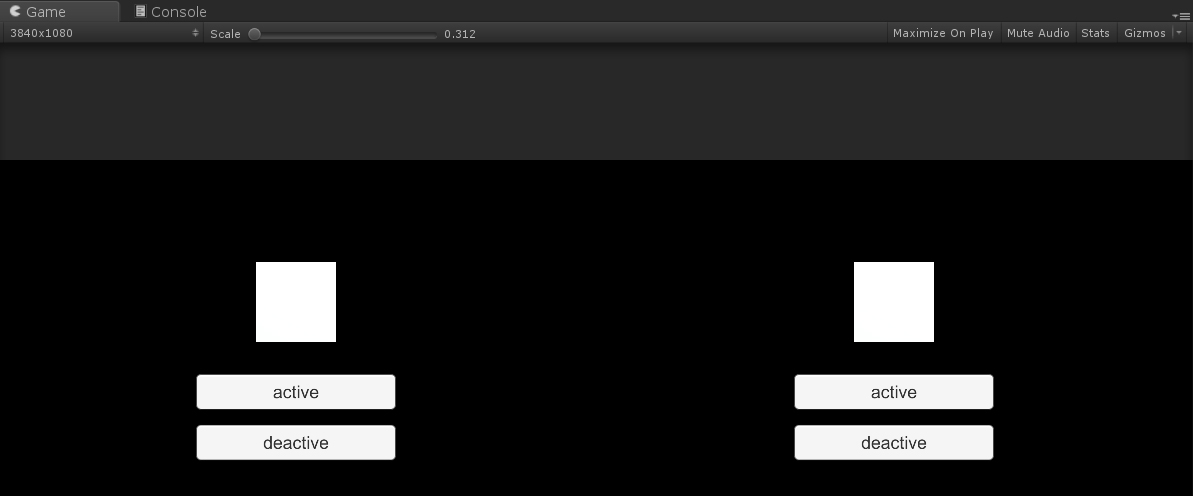
Objective:
- When pointing the controller at the cube, its color will change to green.
- The color of the cube will randomly change when you press the trigger button.
- The cube will rotate with the controller.
- Activate or deactivate the cube for rotation by pressing the UGUI button.
Steps:
- Drag NRCameraRig and the NRInput prefab to the scene hierarchy.

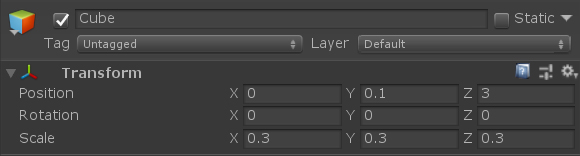
- Create a cube. In the Inspector window, set its position to (0, 0.1, 3), and scale to (0.3, 0.3, 0.3).
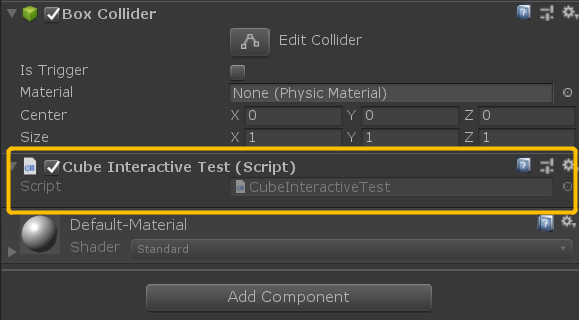
Create a script named “CubeInteractiveTest.cs” as follows and add it to the cube.
public class CubeInteractiveTest : MonoBehaviour, IPointerClickHandler, IPointerEnterHandler, IPointerExitHandler
{
 private MeshRenderer m_MeshRender;

 void Awake () {
     m_MeshRender = transform.GetComponent<MeshRenderer>();
 }

 void Update()
 {
     //get controller rotation, and set the value to the cube transform
     transform.rotation = NRInput.GetRotation();
 }

 //when pointer click, set the cube color to random color
 public void OnPointerClick(PointerEventData eventData)
 {
     m_MeshRender.material.color = new Color(Random.Range(0f, 1f), Random.Range(0f, 1f), Random.Range(0f, 1f));
 }

 //when pointer hover, set the cube color to green
 public void OnPointerEnter(PointerEventData eventData)
 {
     m_MeshRender.material.color = Color.green;
 }

 //when pointer exit hover, set the cube color to white
 public void OnPointerExit(PointerEventData eventData)
 {
     m_MeshRender.material.color = Color.white;
 }
}
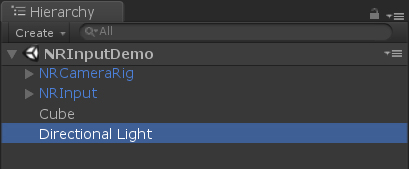
Add a DirectLight to brighten the cube.
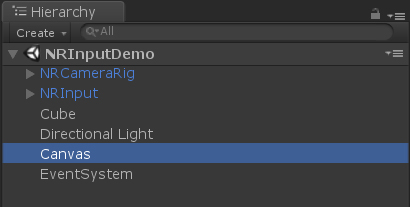
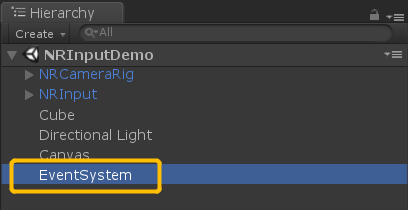
- Add a Canvas and delete the EventSystem.
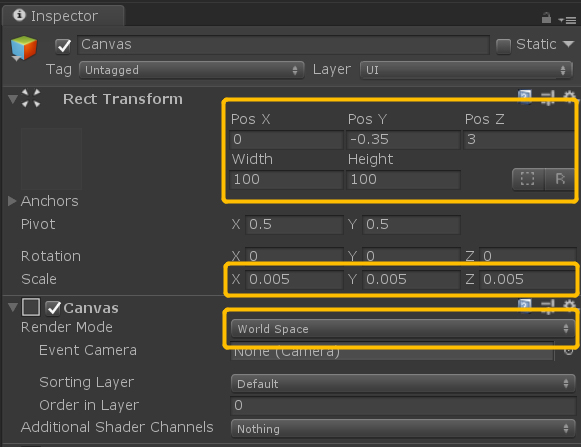
- Set the Canvas RenderMode to WorldSpace, and then set its position and scale to an appropriate value such as that listed below.
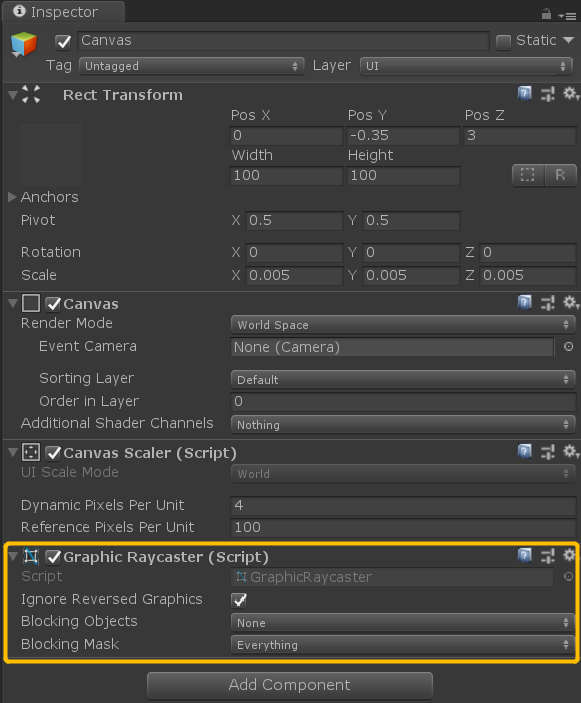
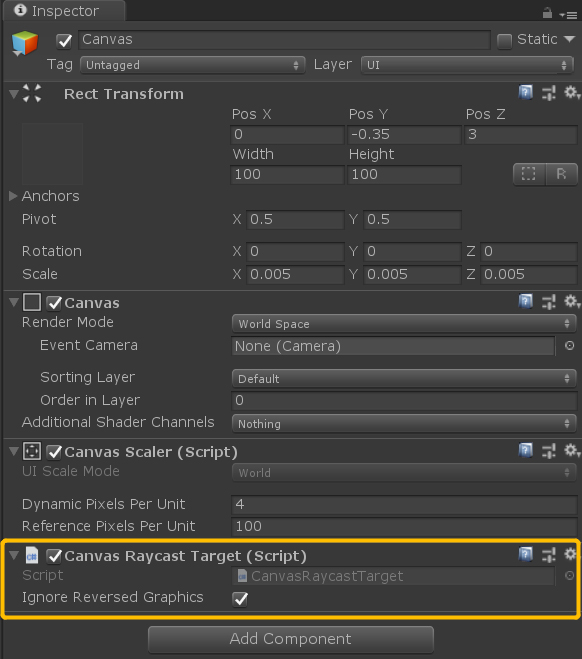
- Remove the “Graphic Raycaster” component from it and add <u>Canvas Raycast Target</u>.
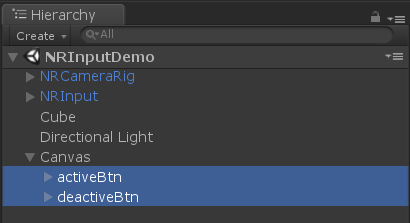
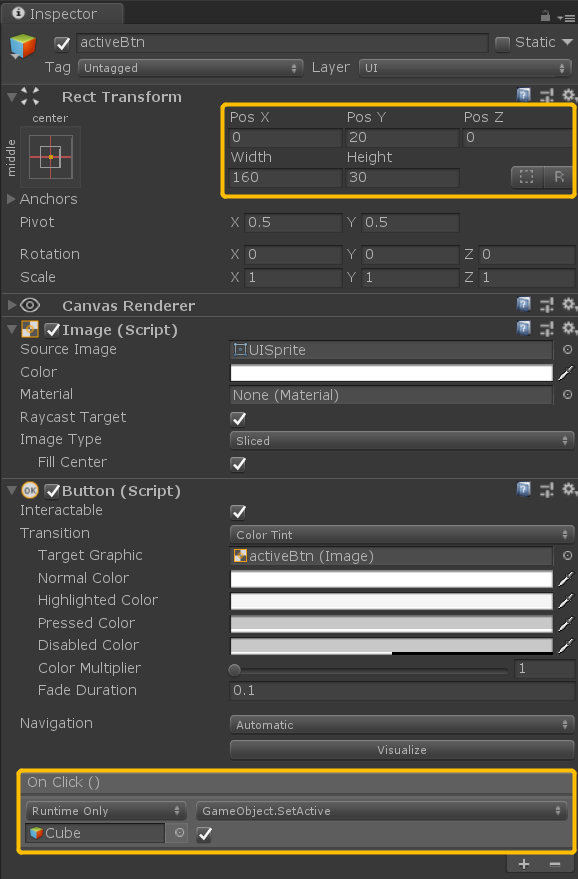
- Add two buttons to the Canvas as its children. Name one button <u>activeBtn</u> and the other <u>deactive</u>. Remember to also change the button text.

- Set the buttons to an appropriate position and add the <u>SetActive</u> function as their OnClick events.
- Finally, compile the app. An interactive mixed reality app utilizing user input with a Nreal Light controller is complete.